 Communications Tools Communications Tools
Today, the term ‘communications’ usually refers to links created between computers by means of high-level protocols, such as Internetworking Protocol (IP), which forms the basis of the Internet. Although modern versions of the Mac OS also support such mechanisms, they also include software that provides communication at a much lower level, allowing information to be conveyed directly between computers, either by means of a serial port or a modem and a telephone line.
Normally, a communications application is required for such a data transfer, although some general-purpose Mac OS programs, such as ClarisWorks 5, can also be used. A typical application has a Settings menu that leads you into the following kinds of dialogue:-
| Dialogue Name | Function | Explanation |
|---|---|---|
| Connection | Data Link Layer | Ensures hardware can convey data bits |
| Terminal | Terminal Emulation | Makes the Mac act as another type of machine |
| File Transfer | Transport Layer | Conveys files reliably over a link |
The content of such dialogues is often provided by the Communications Toolbox (CTB), part of the Mac’s system software. The CTB uses communications tools, also known as basic connectivity tools, which are stored as individual files in the Extensions folder. These tools work with any suitable hardware, including a CTB-compatible serial port expansion card.
The following sections describe how to use an application that’s based on the CTB windows. The screen shots are from ClarisWorks 5, an application that uses the CTB throughout.
 Connection Settings
These settings match the software to the actual hardware used to create a link, informing the computer about the port that’s in use and what’s connected to it.
Depending on your version of the Mac OS, there can be restrictions on how you can use the Printer or Modem ports for other purposes whilst AppleTalk is active. For example, with Classic AppleTalk in operation the Printer port can’t be used for anything other than conveying LocalTalk data.
With the Open Transport version of AppleTalk you can use whichever port isn’t assigned to AppleTalk. However, if you need both the Printer and Modem ports for serial devices, you must ensure that the Remote Only extension is available and selected in the AppleTalk control panel.
The following connection tools are commonly used:-
 Apple Modem Tool
This tool is suitable for almost any modem and a telephone link, although it can be difficult to set up if you employ a non-standard modem or require to use some of its more advanced features.
The window is shown here:-
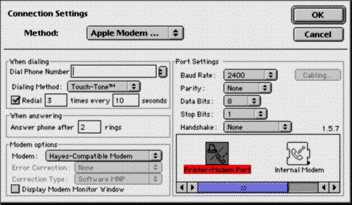
Providing you select the correct device under the Modem menu, most of the default settings should give reasonable results. Note, however, that the Port Settings area is particularly crucial.
The window’s settings are as follows:-
Dial Phone Number: number for which the settings apply
Dialling Method: select Touch-Tone, Pulse or Mixed, as required by your phone system
Redial: number of attempts the modem should make to get a connection
Answer phone after: the number of times the phone rings before the modem responds
Modem: select your modem from the list, or choose Hayes-Compatible if not shown
Error Correction: select Required, Optional or None (greyed-out if unavailable)
Correction Type: select Software MNP or Hardware (greyed-out if unavailable)
Display Modem Monitor Window: select only if required
Baud Rate: select a suitable rate (only rates for your modem are shown)
Parity: select None, Even or Odd (usually None)
Data Bits: the number of bits in a byte, such as 5,6,7 or 8 (usually 8)
Stop Bits: number of bits indicating end of a byte, such as 1, 1.5 or 2 (usually 1)
Handshake: select None, XON/XOFF, DTR & CTS, DTR Only, CTS Only
Cabling: click on this button to see a picture of the modem to computer cable
Port: select Modem, Printer or expansion card port, as shown by icons
If you have an unusual telephone circuit or non-standard modem you should select Custom Modem in the Modem pop-up menu, which causes this window to appear:-
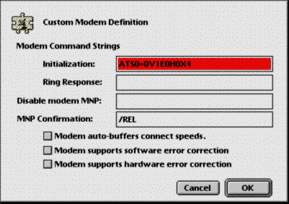
This contains the following:-
Initialization: sets up modem options at beginning of a session; see modem manual for details
Ring Response: see your manual for details
Disable modem MNP: lets communication application disable MNP hardware in the modem
MNP Confirmation: message from application to modem, confirming the use of MNP
Modem auto-buffers connect speeds: select if modem has buffers for different speeds
Modem supports software error correction: select if modem supports MNP or V.42 software
Modem supports hardware error correction: select if modem contains MNP or V.42 hardware
If you check the error correction boxes in the above, the Error Correction and Correction Type pop-up menus in the Menu options area of the main window cease to be greyed-out. However, this only happens when the appropriate type of modem is selected in the Modem menu.
Serial ToolThis tool should be used if you want to sent data directly to another computer, terminal or personal organiser. It’s ideal for transferring data between a Mac OS machine and a PC.
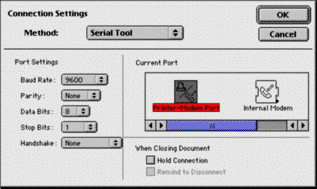
Its simple window contains the following options:-
Baud Rate: set to 75, 110, 134.5, 150, 200, 300, 450, 600, 1200, 1800, 2000, 2400, 3600, 4800, 9600, 19200, 38400 or 57600 bit/s, so as to match the other device
Parity: select None, Even or Odd (usually None)
Data Bits: the number of bits in a byte, such as 5,6,7 or 8 (usually 8)
Stop Bits: number of bits indicating end of a byte, such as 1, 1.5 or 2 (usually 1)
Handshake: select None, XON/XOFF, DTR & CTS, DTR Only, CTS Only
Select Modem, Printer or expansion card port, as shown by icons
Hold Connection: retains connection when closing application’s communication document
Remind to Disconnect: gives reminder when closing document
Traditionally, mainframe computers are reached via a dumb terminal, consisting of a screen, keyboard and serial port. Using the correct terminal settings, you can emulate such a terminal.
Control-S for Stop and Control-Q for Continue. In some instances, Mac OS software uses the ⌘ key in place of the Ctrl key for the Control functions, although this isn’t always convenient.The following terminal tools are commonly used:-
 TTY Tool
This emulates a simple teletype (TTY) link, also known as Telex, which is normally employed for conveying 7-bit data to a teleprinter.
Here’s the window provided by this tool:-

which has the following settings:-
On Line: when selected any data you type is sent down the link
Local Echo: what you type appears on the screen
Width: the size of text in a connection window, either 80 or 132 columns of characters
Size: the font size of text in the window, usually 9 point or 12 point
Show Control Characters: select to see normally invisible characters
Auto Wrap to Next Line: saves you pressing Return at the end of each line
Auto Repeat Keys: when a key is held down a string of characters is produced
Repeat Control Keys: as above, but for control commands
Block: selected text is shown as white text in a black block
Underline: selected text is underlined
Jump: scrolling causes text to move to next block
Smooth: scrolling operates normally
Swap ‘Backspace’ & ‘Delete’: swaps the keys for anyone not used to a Mac keyboard
New Line on a Return: moves to new line on pressing Return or when receiving LF (line feed)
VT102 ToolThis emulates a simple computer terminal of the VT52, VT100 or VT102 type, as used for conveying 7-bit data. The VT100 and VT102 systems are compatible, although the ANSI variation uses separate alphanumeric keys and cursor keys whilst the DEC variant employs escape sequences for the alphanumeric characters plus an alternative set of cursor codes.
The tool uses the four windows described below, which are selected by the scrolling icon list on the left of the main window.
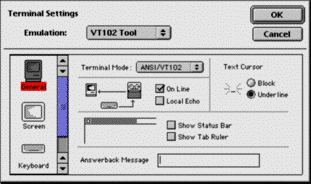
Terminal: select ANSI/VT102 or VT52, as required
On Line: select to send anything that you type down the link
Local Echo: select to see what you type appear on the screen
Block: selected text is shown as white text in a black block
Underline: selected text is underlined
Show Status Bar: provides bar at top of VT102 window, simulating VT102 keyboard indicators
Show Tab Ruler: puts a ruler at top of the VT102 window
Answerback Message: for identifying your Mac with a remote computer
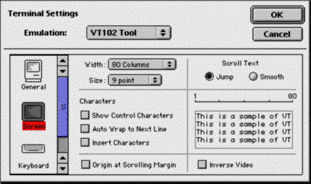
Width: the size of text in a connection window, either 80 or 132 Columns of characters
Size: font size for text in the window, usually 9 point or 12 point
Show Control Characters: lets you see characters that are normally invisible
Auto Wrap to Next Line: saves pressing Return at the end of each line
Insert Characters: lets you type over existing characters
Origin at Scrolling Margin: for moving cursor outside the scrolling region
Jump: scrolling causes text to move to next block
Smooth: scrolling operates normally
Inverse Video: produces white text on black background, as used in terminals
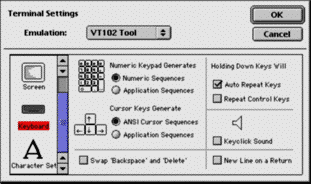
Numeric Sequences: uses number keys, as in an ANSI terminal
Application Sequences: uses escape sequences, as in a DEC terminal
ANSI Cursor Sequences: uses arrow keys, as in an ANSI terminal
Application Sequences: uses cursor codes, as in a DEC terminal
Swap ‘Backspace’ & ‘Delete’: swaps the keys for anyone not used to a Mac keyboard
Auto Repeat Keys: when a key is held down a string of characters is produced
Repeat Control Keys: as above, but for control commands
Keyclick Sound: produces click when you press a key
New Line on a Return: moves to new line on pressing Return or when receiving LF (line feed)
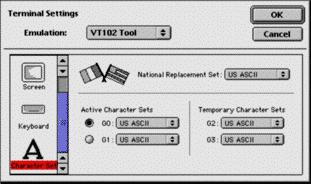
National Replacement: the main character set in use
You can switch between the Active Character Sets (GO and G1) and the Temporary Character Sets (G2 and G3) by pressing Ctrl-O and Ctrl-N while using the terminal. Each set can contain the National Replacement Set, a Graphics set or the International character Set.
File transfer software should transport a file over a link without damage and at the highest possible speed. It’s vitally important that the same settings are used at both ends of the link.
The following file transfer tools are used:-
 Text Tool
A very simple mechanism for transferring a plain text file over a link. Note that any resources in a text file, such as the styl (styled text) resource in a SimpleText document, are lost during transfer.

Delay per Character: delay accommodating slow systems, usually between 0 and 32767
Delay per Line: as above, but only introduced at the end of lines
End Lines With: use CR for Mac text, LF for Unix and CR & LF for a PC
Wrap Lines at Column: sets the display width, typically 80
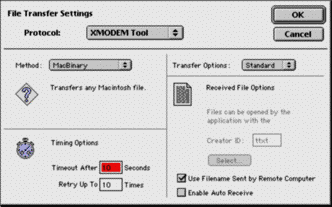
XMODEM ToolA standard protocol for transferring files over telephone lines using 8 data bits and no software handshaking. It employs CRC or checksums in blocks of 128 or 1024 bytes.
The tool‘s single window has settings for:-
Select one of the following:-
MacBinary: for sending any Mac file, including its resource fork
MacTerminal 1.1: for sending any Mac file, assuming automatic file reception
Straight XMODEM: for sending a text file’s data fork, without converting line endings
XMODEM Text: for sending a text file’s data fork, with line ending conversion
Timeout After_Seconds: time that Mac waits for block of data before giving up transfer
Retry Up To_Times: number of times computer tries to send a block of data
Select one of the following error correction systems:-
Standard: 128-byte data blocks with checksums
CRC-16: 128-byte blocks with CRC-16 correction
1K Blocks: 1024-byte blocks with CRC-16 checking, giving faster transfer
CleanLink: 1024-byte blocks with CRC-16 checking, no acknowledgement
Creator ID: sets the Mac OS creator code for received files
Select: lets you set the creator code by choosing an application
Use Filename sent by Remote Computer: lets files keep their names
Enable Auto Receive: for automatically receiving files from a computer supporting this feature
Claris Kermit ToolThis is an alternative to XMODEM that uses its own transfer process. It’s supplied with ClarisWorks 5, requiring 8 data bits and no software handshaking.
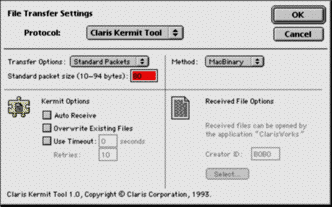
The tool‘s single window has settings for:-
Select one of the following systems:-
Standard Packet: 10-94 bytes long (usually 80)
Long Packet: 10-9024 bytes long (usually 1024)
Sliding Windows: for sliding windows protocol, using 2-31 bytes (usually 8)
Extra Long Packets: 10-857374 bytes long (usually 18050)
Auto Receive: when a mark character is received the file transfer is started
Overwrite Existing Files: select to let an incoming file overwrite a file of the same name
Use Timeout_ seconds: time that Mac waits for block of data before giving up transfer
Retries: number of times computer tries to send a block
Select one of the following:-
MacBinary: for any Mac file, including its resource fork
Binary: for sending a text file’s data fork only, without converting line endings
Text: for sending a text file’s data fork only, with line ending conversion
Creator ID: sets the Mac OS creator code for received files
Select: lets you set the creator code by choosing an application
Other methods of transfer, some of which require special software, include XMODEM-1K, which gives a faster transfer since it always uses 1024-byte blocks. The more advanced ZMODEM provides a wide range of options including 16-bit or 32-bit CRCs. It can send files in batches and can resume the transfer should a crash occur in the middle of the process.
YMODEM, also known as YMODEM-Batch
since it allows files to be sent in batches, is a variation of XMODEM
that sends information about a file in its first block, including its
file name, size and modification date. YMODEM-128, with 128-byte blocks, is rarely used, although the aforementioned YMODEM-1K is sometimes encountered. YMODEM-G is a further development of YMODEM, in which ACK
signals are not used and instead reliance is placed on the error
correction built into the modem. This makes it particularly suitable for
direct connections between computers.
Most people use a modem to gain access to the Internet. This requires you to dial up an Internet service provider (ISP), giving you access to several different servers, each supporting the protocol required for a specific service, such as the World Wide Web (WWW), email or news.
There are other uses for a modem, apart from the Internet. The simplest is peer-to-peer communication, where you dial up another modem and convey data directly between two machines. This is supported by the CTB tools described above, although it’s a technical process. However, such a simple system avoids the need to pay for the services of an ISP. In addition, this kind of link is more secure and usually faster, since the information doesn’t have to pass through any other computers.
Working with an online service is similar in some ways to peer-to-peer communication, except that you communicate with a special computer that lets you download information or upload other material. The original bulletin board service (BBS) providers operated in this way, requiring an application such as FirstClass BBS, although these have been superseded by Internet news groups.
America OnLine (AOL) and CompuServe, complete with their own e-mail services, originated as online providers, supplying textual material, although they have now migrated to the Internet. CompuServe could be reached using MacCIM, a Mac version of the CompuServe Information Manager (CIM), a front-end to the original and rather rudimentary user interface. Areas of interest to Mac users could be obtained using keywords, such as MACNEW, MACAPP and MACFUN.
Having set up a communications application, you should be ready to make a connection. Whatever you type or whatever text that you receive normally appears in the connection window of your application: you can usually adjust the size of font and font style to taste.
The link between modem and computer can be tested in this window by typing AT and Return. As you type each character the modem’s status lights should flash. And when you finally press Return an OK should appear in the application’s window.
You can test the dialling in this mode by typing ATDT followed by the phone number and Return. You should hear any conversation on the modem’s speaker (if it has one). When you’ve finished enter a ; (semi-colon) to take the modem off-line.
The following information applies to a the ClarisWorks 5 application. Assuming you have the correct Connection Setting, you can try to communicate with another modem. Before doing so, you may need to make entries in the Phone Book, which appears under the Session menu.To establish a link, you must choose Session ➡ Open Connection. As the application dials the number something similar to this appears on the screen:-
where 888-3456 is the number you’re dialling. After a while, you should hear the modems happily screaming at each other: just press Return and hopefully the noise will stop.
Once you’ve made a connection you may find you can’t see what you’re typing. If so, you should check the Local Echo box in the Connection Settings window. Conversely, if everything you type appears twice you should deselect it. Similarly, you should turn Local Echo off for peer-to-peer communication, although you should enable it when communicating with a BBS.
Having
established keyboard communication you may wish to send or receive an
entire file. Many protocols and terminals can handle a binary file, containing all possible digital values, whilst other services, such as email, can only use an ASCII text file, containing values between 0 and 127.
To send a file in ClarisWorks 5, simply select Session ➡ Send File, although if you want to send several files you should select Session ➡ Send Batch. To receive a file you must choose Session ➡ Receive File, and then you must wait.
©Ray White 2004.
